

2026 Binance Registration Complete Guide: Binance Account Opening, Identity Verification, and Deposit Tutorial
The latest 2026 Binance registration tutorial, guiding you step-by-step through Binance account opening, KYC identity verification, and deposit operations. Includes detailed screenshots and FAQ, suitable for crypto beginners.
Table of Contents
- Why Choose Binance?
- Preparation Before Registration
- Detailed Steps for Binance Account Opening
- KYC Identity Verification Process
- Binance Deposit Tutorial
- FAQ
Introduction
Imagine this scenario: You just heard that Bitcoin has hit a new high, someone on your social media is showing off their gains, and you’re itching to try it out. But when you open various exchange pages, you’re overwhelmed—what is this? How do I open an account? Is my money safe?
Don’t worry, I know that feeling.
When I first got into crypto, just registering on an exchange took me two days. KYC verification failed three times, and my hands were shaking when I made my first deposit, afraid that once the money was sent, it would never come back. Looking back now, I wish someone had guided me step by step.
This article is the tutorial I wanted back then. No fluff, no selling courses—just step-by-step instructions on how to complete the entire process from registration to deposit on Binance. Binance is currently the world’s largest cryptocurrency exchange by trading volume, relatively beginner-friendly, and has decent security.
Estimated reading time: 6 minutes. I suggest you follow along and operate as you read.
Why Choose Binance?
What Are Binance’s Advantages?
There are hundreds of cryptocurrency exchanges out there, so why do most experienced players recommend beginners start with Binance?
Binance was founded in 2017 by Changpeng Zhao (CZ). Although it has had some security issues in the past (e.g., the 2019 hack where 7,000 BTC were stolen), overall, its technical and financial strength is strong, and it fully compensated users after the incident. In terms of scale, Binance remains the world’s largest exchange by trading volume, often exceeding $10 billion in daily volume.
For beginners, Binance offers several practical benefits:
First, it supports a Chinese interface. You don’t need to struggle with English; all features have Simplified Chinese versions. This is crucial for newcomers. I’ve seen friends who, due to not understanding the English interface, copied the wrong deposit address and lost thousands of dollars.
Second, it has a wide variety of coins. Binance lists over 500 cryptocurrencies, so you can find most mainstream coins (Bitcoin, Ethereum) and emerging ones. Unlike some smaller exchanges where the coin you want isn’t available, forcing you to register on another platform.
Third, it has good liquidity. Simply put, it’s easy to buy and sell. When you want to buy, you can buy; when you want to sell, you can sell, without having to wait forever for someone to take the other side.
Fourth, it has rich educational resources for beginners. Binance Academy offers many free basic tutorials. While the quality varies, it’s sufficient for beginners.
What Are Binance’s Disadvantages?
Of course, Binance isn’t perfect.
The biggest issue is regulation. Due to policy reasons, Binance does not operate officially in mainland China. So if you’re in mainland China, you may encounter network connectivity issues and sometimes need to use a VPN. However, registration and use themselves are not illegal; it’s a regulatory gray area, and you need to assess the risks yourself.
Another drawback is slow customer service response. With so many users, submitting a ticket often means waiting days for a reply. If it’s an urgent issue (e.g., funds locked), this can be stressful.
Also, the platform has too many features, making the interface look complex. When I first opened the Binance app, I was overwhelmed by all the buttons, charts, and numbers, not knowing where to start. This article will help you focus on the most important features and ignore the rest for now.
Preparation Before Registration
What Do You Need to Prepare?
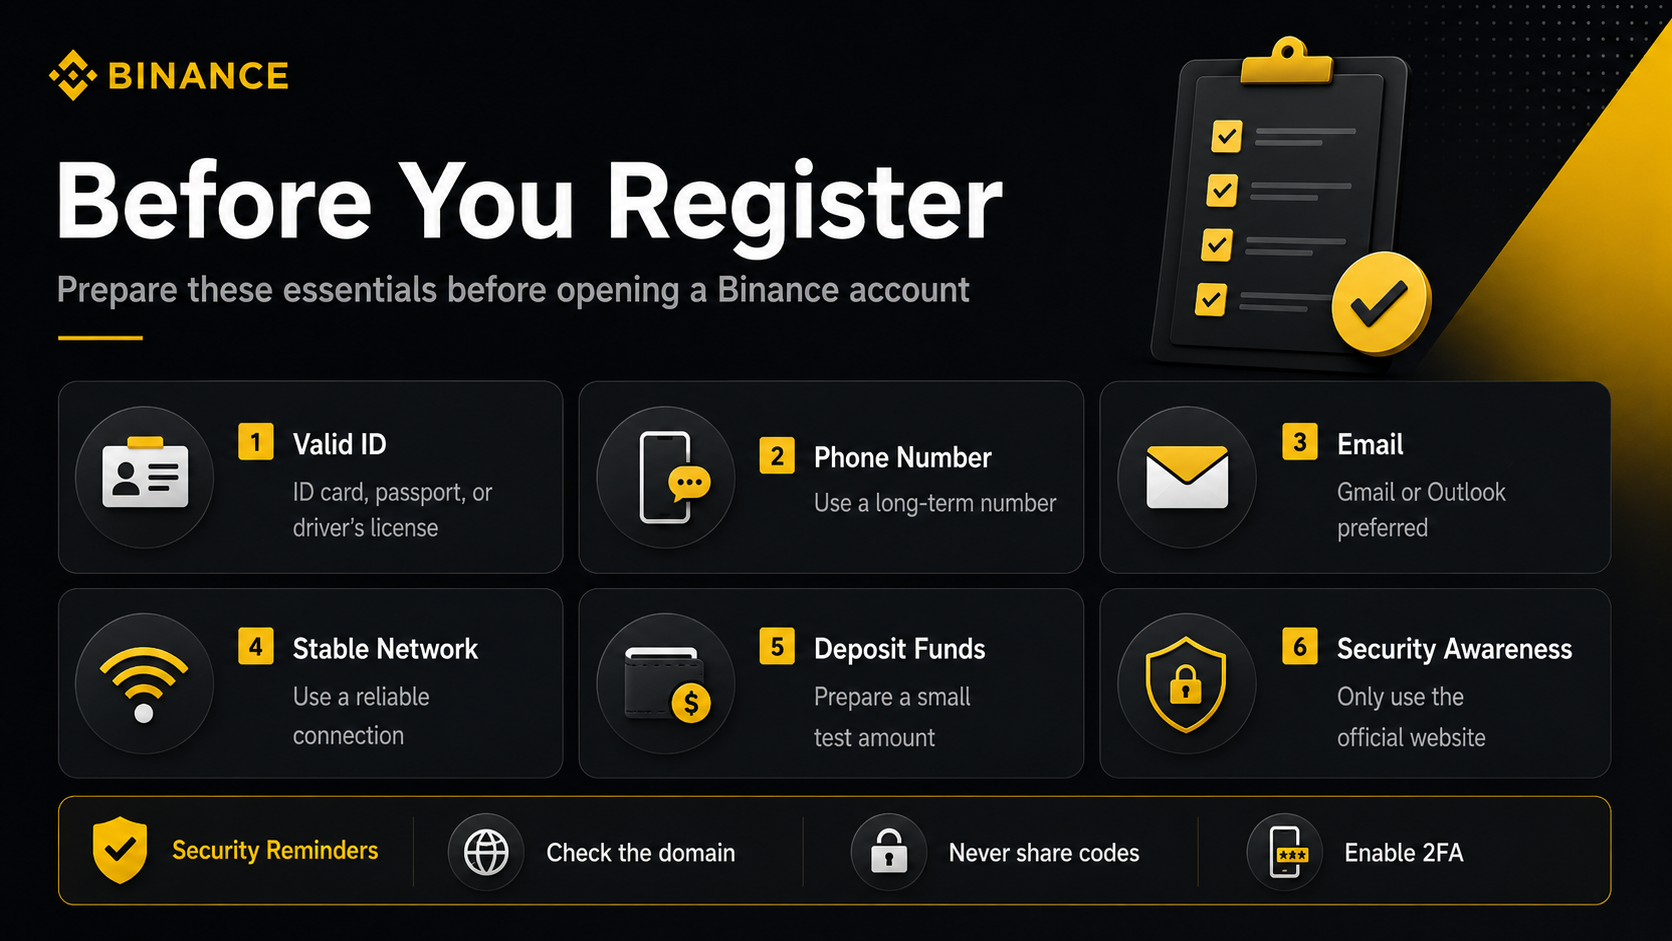
Before starting registration, prepare these items to avoid getting stuck midway:
1. Valid ID
KYC verification requires real-name authentication. Prepare one of the following:
- ID card (recommended, fastest review)
- Passport
- Driver’s license
The ID must be valid, with clear photos and no missing corners. I once had a painful experience—I used an ID card with slightly worn edges and got rejected. I had to retake a new photo to pass.
2. A phone number that can receive SMS
Registration requires phone number verification. Use a number you use long-term. Avoid temporary number platforms; they’re insecure, and Binance’s risk control system may flag them, leading to account suspension.
3. A commonly used email
Use mainstream emails like Gmail or Outlook. QQ mail or 163 mail can work, but sometimes Binance emails get caught in spam. Before registering, check your spam folder and whitelist Binance’s domain (binance.com).
4. A stable network environment
Binance’s website is not very stable in China, so prepare a VPN. If using a mobile phone, try both WiFi and 4G/5G; sometimes one works when the other doesn’t.
5. Prepare deposit funds
Binance supports multiple deposit methods, the most common being:
- Bank card/credit card purchase (higher fees, about 2-3%)
- C2C peer-to-peer trading (low fees, but need to check seller reputation)
- Transfer from other wallets or exchanges (if you already have crypto)
Beginners should start with $100-500 to test the waters, not go all-in immediately.

Special Reminder: Security Precautions
There are many scammers in crypto. Remember these points before registering:
- Always download from the official website (binance.com) or official app; never click links sent by others
- Never share your verification code with anyone, including “customer service”
- Enable two-factor authentication (2FA); I’ll teach you how to set it up later
- For your first deposit, test with a small amount to confirm it arrives and can be withdrawn before adding more
I had a friend who clicked a fake website link, got his account hacked, and 2 ETH (worth over $4,000 at the time) were instantly transferred out, never to be recovered.
Detailed Steps for Binance Account Opening
Step 1: Visit the Binance Official Website
Open your browser and go to www.binance.com to access the Binance official website.
Be careful to check the URL; there are many phishing sites like binance.cc or binance-support.com. The official domain is only binance.com and binance.info (mirror for some regions).
If you’re in mainland China, you may need a VPN to access it. Once the page loads, you should see a language selector in the top right corner. Confirm it’s set to “简体中文” (Simplified Chinese); if not, switch manually.

Step 2: Click Register
There’s a yellow “Register” button in the top right corner of the page. Click it.
Binance offers two registration methods:
- Email registration (recommended, more stable)
- Phone number registration
I recommend email registration, as changing your phone number later won’t affect your account. Of course, you can also use phone number registration; the process is similar.
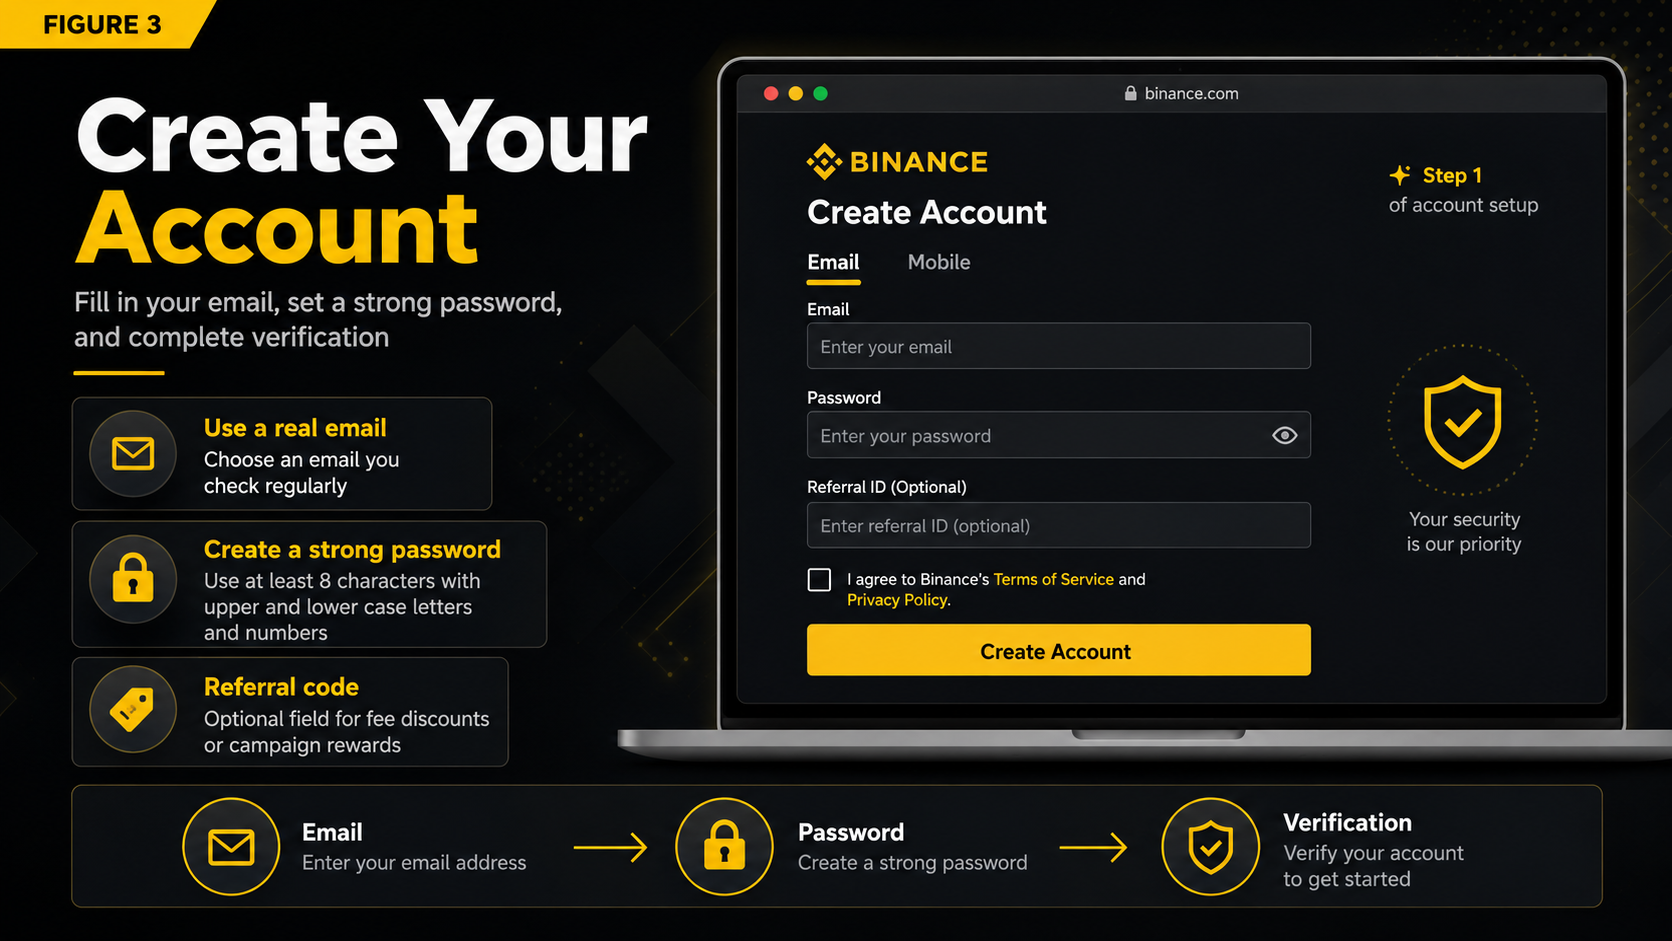
Step 3: Fill in Registration Information
If you choose email registration, you need to fill in:
- Email address: Enter your commonly used email
- Password: Set a login password. It must be at least 8 characters, including uppercase and lowercase letters and numbers. Don’t use simple passwords like “Binance123”; they’re easy to crack. Use a password manager to generate a strong random password.
- Referral ID (optional): If someone gave you a referral code, you can enter it. Using a referral code usually gives both parties a fee discount, typically 10-20%. If you don’t have one, you can search online for public codes.
Check the user agreement, then click “Create Account.”

Step 4: Email Verification
After registration, Binance will send a verification email to your email address with the subject “Binance - Please verify your email.”
Open your email, find this message, and click the yellow “Verify Email” button inside. If you don’t receive it, wait a few minutes and refresh, or check your spam folder. If you still can’t find it, click “Resend.”
After successful verification, the page will automatically redirect to Binance, showing “Email verified successfully.”
Step 5: Phone Verification (Important)
Although you registered with email, Binance now requires phone number binding for account security.
Click “Bind Phone Number,” select your country/region (China +86), enter your phone number, and click “Send Verification Code.”
Note: Some virtual operator numbers (e.g., starting with 170, 171) may not receive the code. If it fails after several attempts, try a different phone number.
After receiving the SMS code, enter it and click “Submit.”
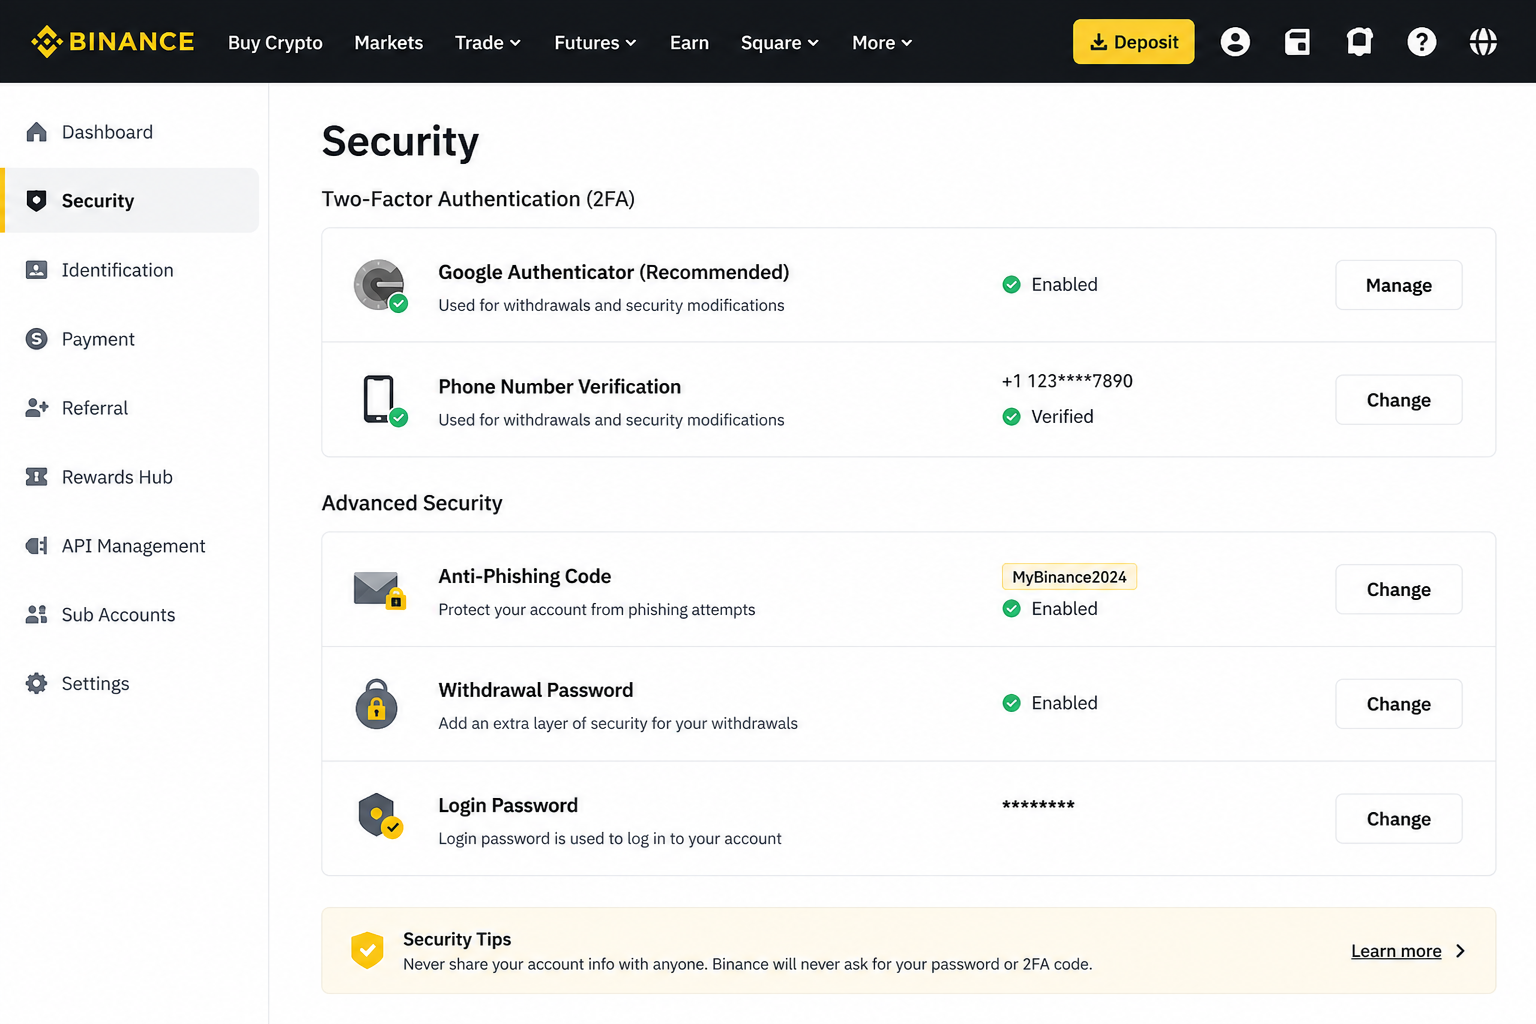
Step 6: Set Up Security Items
After phone verification, Binance will guide you to set up security items. I strongly recommend setting these up now; don’t skip them.
1. Google Authenticator
This is the most important security setting. I highly recommend enabling it.
Click “Enable,” and Binance will display a QR code and a 16-character key.
Open the Google Authenticator app on your phone (download it from the app store if you don’t have it), click the ”+” icon at the bottom right, select “Scan a QR code,” and scan the QR code on the screen. After scanning, the app will show a 6-digit code that refreshes every 30 seconds.
Critical step: Write down the 16-character key on paper and store it in a safe place. This is your backup key; if you lose your phone, you can use it to recover Google Authenticator.
Enter the 6-digit code from Google Authenticator and click “Submit” to complete binding.
2. Anti-Phishing Code
This is a simple but useful feature. Set a 4-20 character string (e.g., your nickname abbreviation). After that, every email from Binance will include this code. If you receive an email without this code, it’s a phishing email—delete it immediately.
Click “Set Anti-Phishing Code,” enter your desired code, confirm with Google Authenticator, and complete the setup.
3. Withdrawal Password (Optional)
By default, Binance uses Google Authenticator to confirm withdrawals, but you can also set an additional withdrawal password. If you’re worried about someone accessing your phone, you can enable this feature.

At this point, your Binance account is registered. But note, you still can’t trade or deposit because you haven’t completed KYC identity verification.
KYC Identity Verification Process
KYC stands for “Know Your Customer,” which is identity verification. This is a mandatory compliance process for all legitimate exchanges to prevent money laundering and fraud. Binance’s KYC has several levels; completing basic verification is sufficient for most beginners’ needs.

KYC Level Explanation
Binance’s KYC has three levels:
- Unverified: Can only browse; cannot trade, deposit, or withdraw
- Basic Verification (Verified): Can trade and deposit; 24-hour withdrawal limit of $8 million equivalent
- Advanced Verification (Verified Plus): Higher withdrawal limits (over $8 million) and access to more features
For most beginners, completing basic verification is enough.
Basic Verification Steps
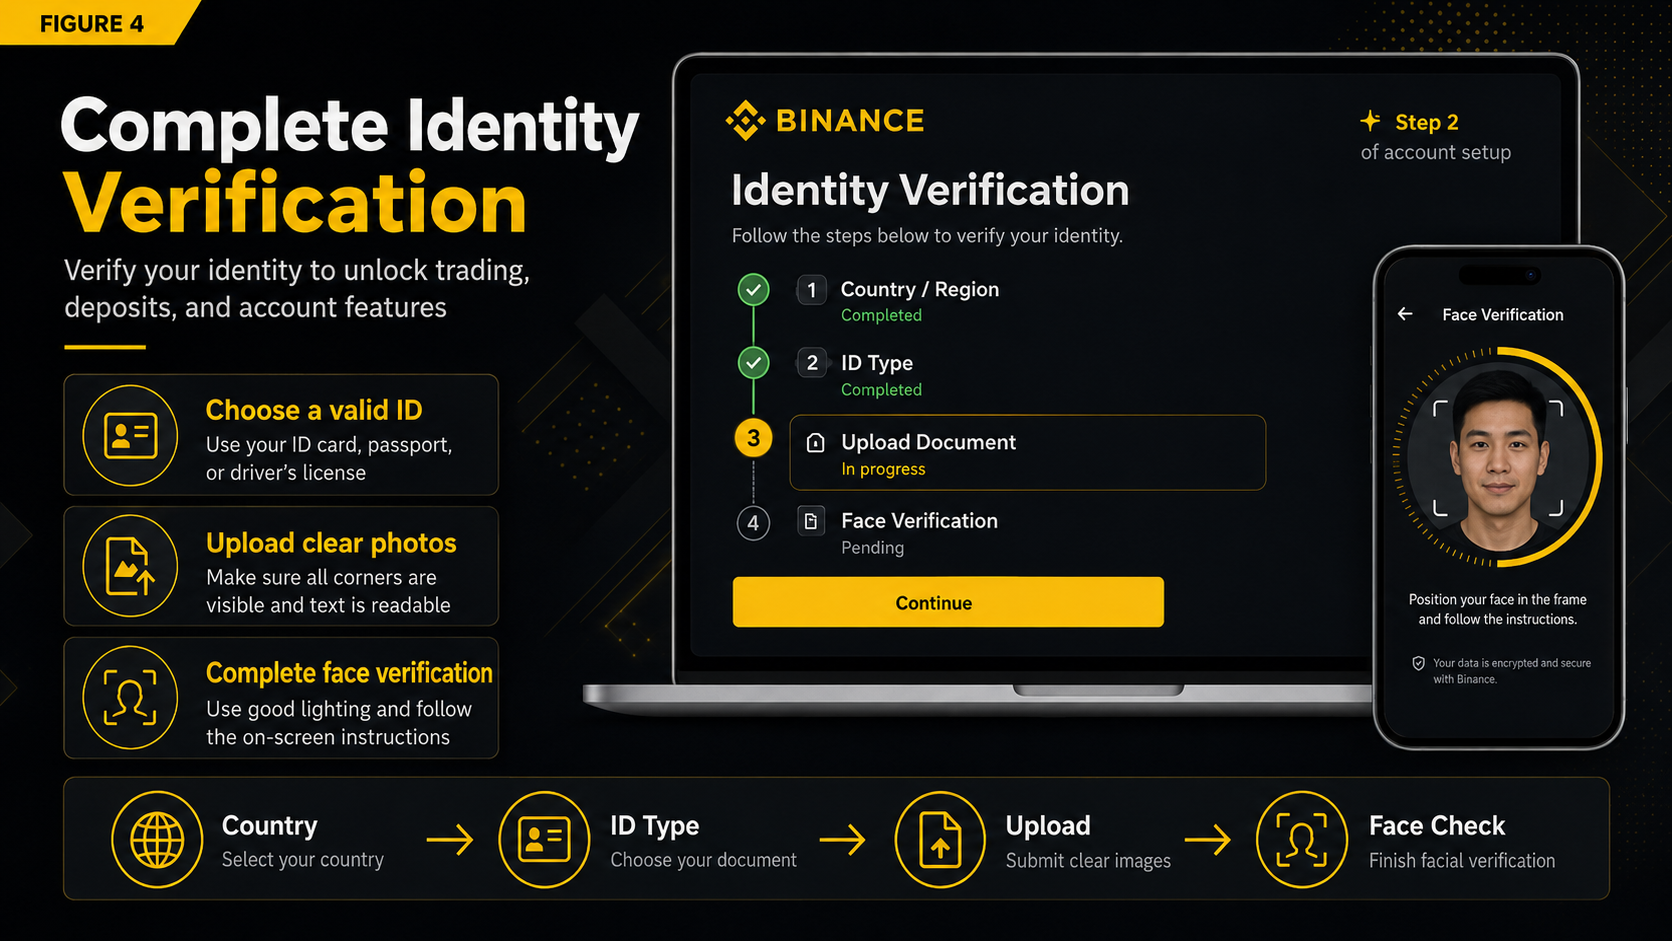
Step 1: Enter the Verification Page
After logging into Binance, hover over the avatar in the top right corner and select “Identity Verification,” or in the app, go to “Personal Center” - “Identity Verification.”
Click “Verify Now” or “Start Verification.”
Step 2: Select Country/Region
Select the country/region indicated on your ID. This step is important; choosing incorrectly may cause verification failure.
If you have a Chinese passport but are abroad, select China. If you have residency abroad, you can select that country, but you’ll need to provide the corresponding ID.
Step 3: Select ID Type
Choose the type of ID you’ll use:
- ID card
- Passport
- Driver’s license
ID card verification is usually the fastest, often completed in minutes. Passports and driver’s licenses may take hours to a day.
Step 4: Upload ID Photo
This step is crucial; photo quality directly affects approval rate.
Photo requirements:
- The ID must be fully visible, with all four corners showing
- Lighting should be sufficient but without glare
- Text must be clear and readable
- Do not cover any ID information
- Hold the camera steady to avoid blur
Binance supports two methods:
- Take a photo: Use your phone’s camera directly
- Upload file: Use a pre-taken photo from your gallery
I recommend taking a photo directly with your phone; the system will guide you with frame lines to align the ID, increasing the success rate.
Common issues:
- Rejected: ID photo unclear → Retake in a well-lit area, ensuring text edges are sharp
- Rejected: ID information unreadable → Check if the ID is still valid; if it’s worn, try a passport or driver’s license
- Rejected: Photo doesn’t match you → The subsequent facial recognition must match the ID photo. If your ID photo is old and you’ve changed significantly, it may fail
Step 5: Facial Recognition
After uploading the ID, the system will prompt you for facial recognition. This prevents someone from using another person’s ID to register.
Click “Start Facial Verification” and follow the prompts, such as “nod,” “open your mouth,” or “blink.”
Tips for facial recognition:
- Find a place with even lighting, avoiding backlight or darkness
- Align your face with the on-screen frame
- Make clear but not exaggerated movements
- If it fails, try again from different angles
I once failed three times due to heavy shadows under a lamp. Later, I stood by a window with natural light and passed on the first try.
Step 6: Wait for Review
After completing the above steps, the system will show “Under Review.”
Basic verification is usually fast, taking minutes to hours. You can check the progress on the “Identity Verification” page.
Once approved, you’ll receive an email and in-site notification. Then you can start depositing and trading.
What If Verification Is Rejected?
If you receive a rejection notice, don’t panic. Check the reason and address it:
- ID photo issue: Retake with better lighting and clarity
- Information mismatch: Check that the name and date of birth you entered exactly match the ID (including spaces and punctuation)
- Facial recognition failure: Try again in better lighting conditions
- ID not supported: Try a different ID type, e.g., switch from ID card to passport
If you still can’t resolve it, submit a ticket to Binance customer service, but responses may be slow, so be patient.
Binance Deposit Tutorial
After completing KYC, you can finally transfer funds to your Binance account. Binance supports multiple deposit methods. I’ll introduce them in order of beginner-friendliness.
Method 1: Quick Buy (Simplest, but Higher Fees)
This is the most direct method: use a bank card or credit card to buy cryptocurrency directly.
Steps:
- Log into Binance, click “Buy Crypto” on the homepage, then “Quick Buy”
- Select the cryptocurrency you want to buy (beginners should choose USDT, a stablecoin with low volatility)
- Select your fiat currency (CNY for Chinese Yuan)
- Enter the purchase amount
- Choose a payment method (bank card/credit card/Alipay/WeChat, etc.)
- The system will show how much crypto you’ll receive; confirm and click “Buy”
- Complete the payment as instructed
Advantages:
- Simple operation, completed in minutes
- No need to trade with strangers
- Suitable for small test amounts
Disadvantages:
- High fees, typically around 2-3%
- Bank cards may reject crypto-related transactions
- Single and daily limits apply
Notes:
Using a bank card to buy crypto may sometimes be blocked by the bank’s risk control. If this happens, try:
- Using a different bank card
- Reducing the single purchase amount
- Contacting your bank to explain it’s a normal purchase
Honestly, while quick buy is convenient, the cost is high. If you plan to stay in crypto long-term, learn to use C2C trading.
Method 2: C2C Peer-to-Peer Trading (Recommended, Low Fees)
C2C (Customer to Customer) is trading between users, with Binance acting as an escrow to ensure transaction security.
Think of it as Binance’s version of “Xianyu” (a Chinese second-hand marketplace)—sellers list their crypto for sale, buyers pay, Binance holds the funds, and releases the crypto to the buyer after confirming receipt.
C2C Advantages:
- Low fees (usually 0.1% or free)
- Prices are often better than quick buy
- Supports multiple payment methods (bank card, Alipay, WeChat, etc.)
- Flexible transaction limits
Steps:
- Click “Buy Crypto” on the homepage, then “C2C Buy”
- Select the cryptocurrency to buy (beginners choose USDT)
- Select fiat currency (CNY)
- Select payment methods (recommend selecting all three for easier filtering)
- Filter merchants
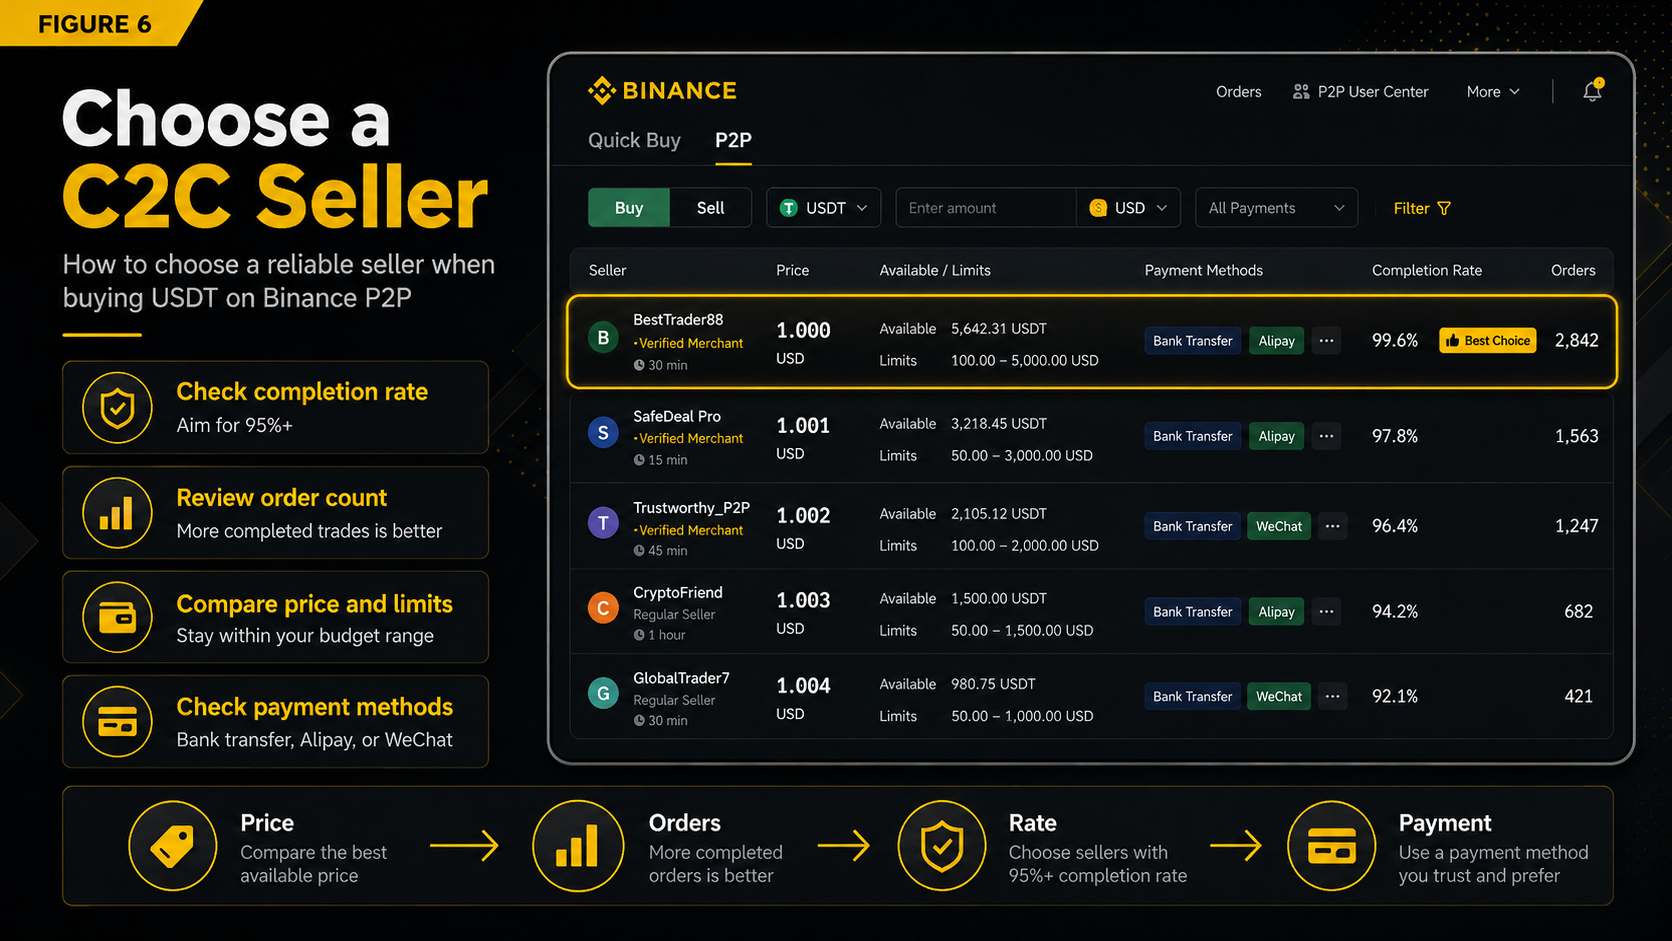
Tips for filtering merchants:
The page will show many sellers’ listings. Key indicators to check:
- Price: Lower is better, but be cautious of prices that are too low
- Limit: Ensure your purchase amount is within the seller’s limit
- Completion rate: Choose 95% or above
- Number of completed orders: More is better, indicating an experienced seller
- Verification level: Gold merchants are more reliable
Merchants with the “Advertiser” tag are usually vetted by the platform and more trustworthy.

- After selecting a merchant, click “Buy”
- Enter the purchase amount or quantity, confirm the total price
- Click “Buy” to enter the transaction page
Transaction process:
On the transaction page, you’ll see the seller’s payment information (bank account number/Alipay account/WeChat QR code).
Important: At this point, Binance has already locked the crypto from the seller’s account, so you don’t need to worry about the seller running away.
- Transfer the displayed amount to the seller using your bank card/Alipay/WeChat
- After the transfer, return to the Binance page and click “I have paid”
- Wait for the seller to confirm receipt (usually within minutes)
- After confirmation, the crypto will be released to your funding account
Notes:
- Do not include sensitive words like “Bitcoin” or “Binance” in the payment memo; write a simple note or leave it blank
- Always pay from your own verified account; don’t have someone else pay, or the seller may refuse to release the crypto
- After transferring, be sure to click “I have paid”; otherwise, the system won’t notify the seller
- If the seller delays confirmation, you can contact customer service
I’ve encountered sellers who deliberately delayed, even after receiving payment, possibly to earn extra interest. Don’t panic; keep the transfer receipt. If it’s overdue (usually 15-30 minutes), click “Appeal,” and Binance customer service will handle it.
Method 3: Transfer from Other Exchanges or Wallets
If you already have cryptocurrency on other platforms (e.g., Huobi, OKX) or wallets, you can transfer it directly to Binance.
Steps:
- On Binance, click “Wallet” - “Spot Wallet”
- Search for the cryptocurrency you want to deposit (e.g., USDT)
- Click “Deposit”
- Select the network (very important!)
- Copy the deposit address
- On the other platform/wallet, initiate a transfer, paste the address, and select the same network
- Confirm the transfer
Network selection is crucial:
This is where beginners make the most mistakes. USDT can be transferred on multiple blockchain networks:
- TRC20 (Tron network): Lowest fees (usually 1 USDT), fastest, recommended for beginners
- ERC20 (Ethereum network): High fees (may be 10-50 USDT), but best compatibility
- BEP20 (Binance Smart Chain BSC): Low fees, fast
- Other networks: e.g., OMNI, SOL
Key rule: The sending and receiving networks must be the same! If you send from Huobi using TRC20, you must select TRC20 on Binance to receive. Choosing the wrong network may result in lost crypto, which is very difficult to recover.
Deposit notes:
- For your first deposit, test with a small amount (e.g., 10 USDT) to confirm it arrives before transferring larger amounts
- Each cryptocurrency has a different deposit address; don’t mix them up
- Some cryptocurrencies require a Memo/Tag (e.g., XRP, EOS); you must fill it in, or the transfer won’t arrive
- Deposit time depends on network congestion, usually minutes to tens of minutes
I had a friend who copied the wrong address on his first transfer, sending 10 ETH to an unknown address, never to be recovered. Now, every time I transfer, I double-check the first and last 6 characters of the address before sending.
FAQ
Q1: Is Binance safe? Will my money be stolen?
As the world’s largest exchange, Binance has relatively comprehensive security measures, including cold wallet storage, multi-signature, and an insurance fund (SAFU). Although there have been security incidents in the past, all user losses were fully compensated.
But remember, an exchange is not a bank; crypto stored there theoretically carries risk. If you buy crypto for long-term holding, after learning more, consider transferring it to your own cold wallet for safekeeping.
Q2: Can users in mainland China use Binance?
Binance does not operate officially in mainland China, and the official website may be blocked, requiring a VPN to access.
However, technically, users in mainland China can register and use Binance. KYC verification with a Chinese ID card works, and C2C trading supports CNY.
Note that this is a regulatory gray area, and you need to assess the policy risks yourself. It’s recommended not to invest more than you can afford to lose.
Q3: What if KYC verification keeps failing?
First, check the failure reason:
- Photo unclear? Retake in good lighting
- ID expired? Use a valid ID
- Facial recognition failing? Remove glasses, hats, ensure no facial obstructions
If it still fails after several attempts, submit a ticket to customer service, or try using a passport/driver’s license instead of an ID card.
Q4: What if I encounter a scammer during C2C buying?
Binance’s C2C has an escrow mechanism; as long as you operate correctly (click “I have paid” after transferring), your crypto is safe.
Common scams:
- Fake customer service: Any “customer service” that contacts you privately is a scammer; real customer service won’t reach out first
- Induced confirmation: The seller says “I’ve received the money, you can confirm first”—never do this; the system will auto-confirm
- Fake transfer screenshot: The seller sends a screenshot claiming they transferred; check your bank account/Alipay; if you haven’t received it, don’t confirm
- Off-platform trading: The seller says “Let’s trade outside Binance for lower fees”—block them immediately
If a dispute arises, keep evidence, click “Appeal,” and Binance will investigate.
Q5: Are there fees for depositing?
- Quick buy: 2-3%
- C2C buy: Usually 0.1% or free (set by the merchant)
- Transfer deposit: Blockchain network fees (TRC20 about 1 USDT, ERC20 may be more expensive)
Q6: Do I need a referral code to register on Binance?
It’s not mandatory, but using a referral code gives both parties a fee discount (usually 10-20%). If a friend recommended you, use their code. If not, you can find public codes online.
Q7: Which Binance app should I download?
Always download from the official website; don’t search in app stores, as many are fake.
Official website: binance.com, click “Download” and select the appropriate version.
Android users can download the APK directly; iOS users may need to switch to an overseas Apple ID to download.
Q8: Is two-factor authentication (2FA) mandatory?
Strongly recommended! It’s like adding a lock to your account. Even if someone knows your password, they can’t log in without Google Authenticator.
Google Authenticator is the most common 2FA tool. Remember to back up the 16-character recovery key; if you lose your phone, you can recover it.
Q9: What if I forget my password or lose Google Authenticator?
If you forget your password, you can reset it via email/phone.
If you lose Google Authenticator, you’ll need the backup recovery key to re-bind. If you’ve lost the recovery key too, you’ll have to contact customer service, provide identity proof, and the process may take a while.
So again: Always back up your Google Authenticator recovery key!
Q10: What else can I do on Binance besides buying crypto?
Binance has many features. Common ones for beginners include:
- Spot trading: Buy low, sell high; the most basic trading method
- Earn: Deposit crypto to earn interest, similar to Yu’ebao (a Chinese money market fund)
- Recurring Buy: Set up automatic periodic purchases to average costs
Advanced features (higher risk, beginners beware):
- Futures trading (leverage)
- Options
- Launchpad (new token sales)
Beginners should first master spot trading before considering other features.
Summary
Here’s the complete process for Binance registration and deposit:
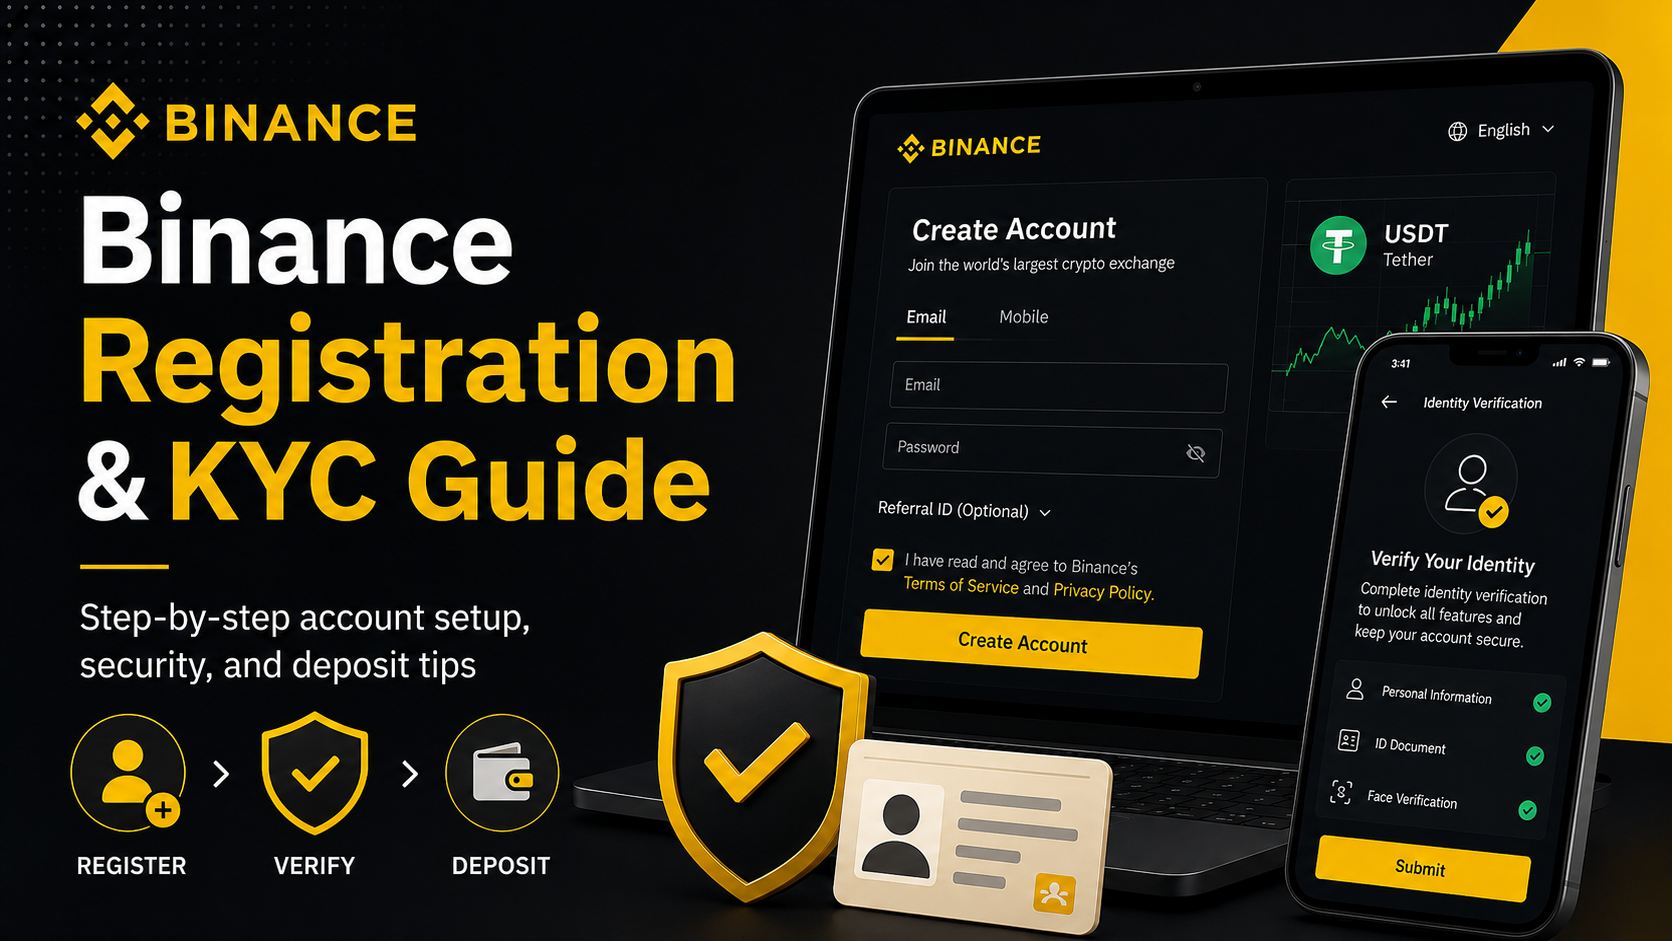
- Register an account: Email/phone registration → verification → set up security items
- Identity verification: Upload ID → facial recognition → wait for review
- Deposit: Quick buy (simple but expensive) or C2C trading (recommended, low fees)
The entire process can be completed in half an hour if all goes smoothly; KYC review may take a bit.
If you’re new to crypto, I suggest:
- Start with a small amount to familiarize yourself with the process
- Set up security settings (especially Google Authenticator)
- Don’t rush into leveraged futures; first understand spot trading
- Crypto is highly volatile; only invest what you can afford to lose
Finally, I wish you a smooth journey in crypto. Remember: slow is fast; surviving longer is more important than making more.